
Hello all!
We were lucky enough to play two great games of warmaster in the same month - and of course that means two reports for all of you!
The first game was the Master Gunner Scenario, which ended with the evil Black Teutonians of Wales (don't ask...) managing to persuade (or clubber) the MG into joining the dark side (they have cookies...). So for this game we agreed that they would get to field the MG and his small artillery force free of charge.
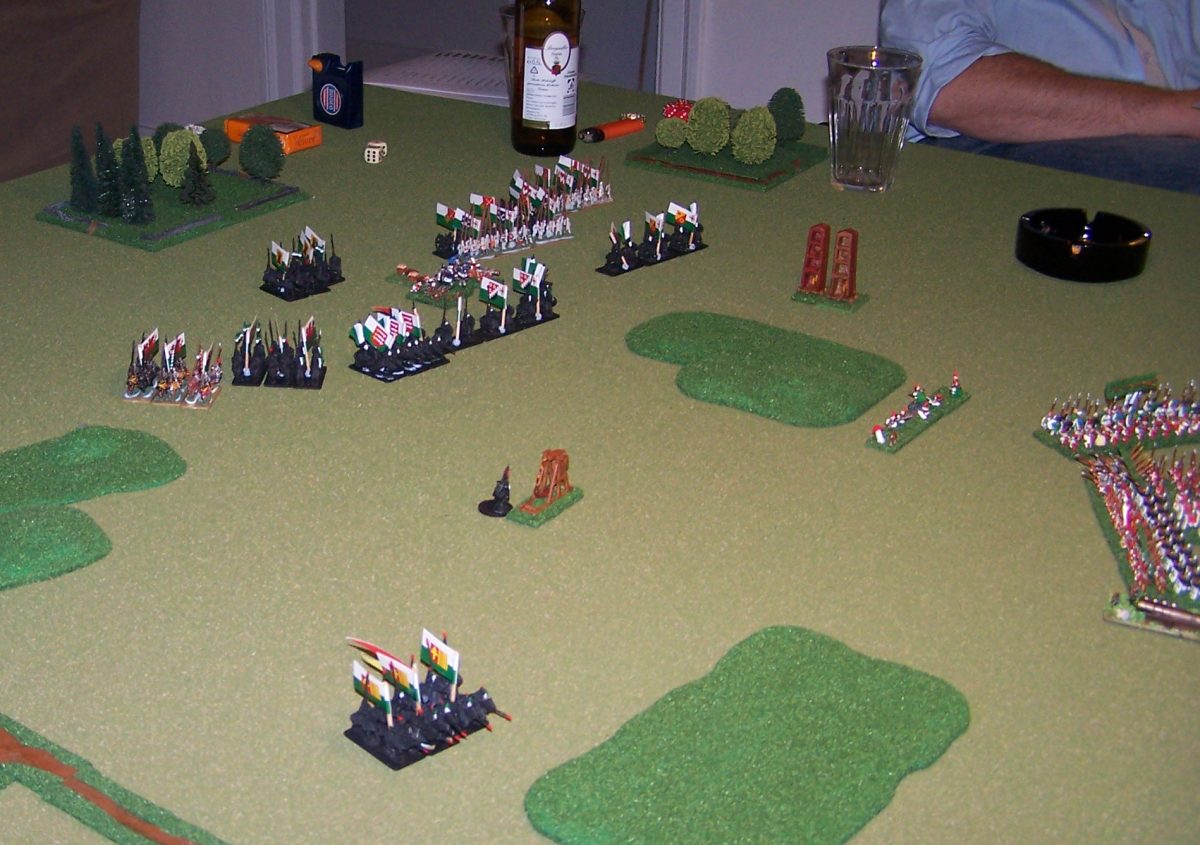
 |
| The Yorkian army arrayed for battle |
This game was fought using the scenario of "Plunder the siegetrain" that I posted earlier - which is basicly a "sieze and control" mission of four objectives, the center of which is a trebuchet that the controller gets to use next battle.
Apart from that the game was played by three armies all of which would be fighting each other - this is not really a problem in the fine game technique of Warmaster, but it is a problem for Battle Chronicler. This fine and free program (I recommend it for all you battle reporting and campaigning) is not set up to handle a conflict of three sides, so in the following report the House of York and Ottoman Empire move and fight in the same turn but it should be relatively clear what happened in most instances.
All pictures and maps are of course clickable to get a better view of the action - and I now see that there is a problem with the name tags of the units. These were set to not show but for some reason they are showing on these images, making it a bit messy. I apologize and might get around to upload new images in the future.
Until then, please enjoy and as always, any comments are appreciated!
Terrain and Objectives:

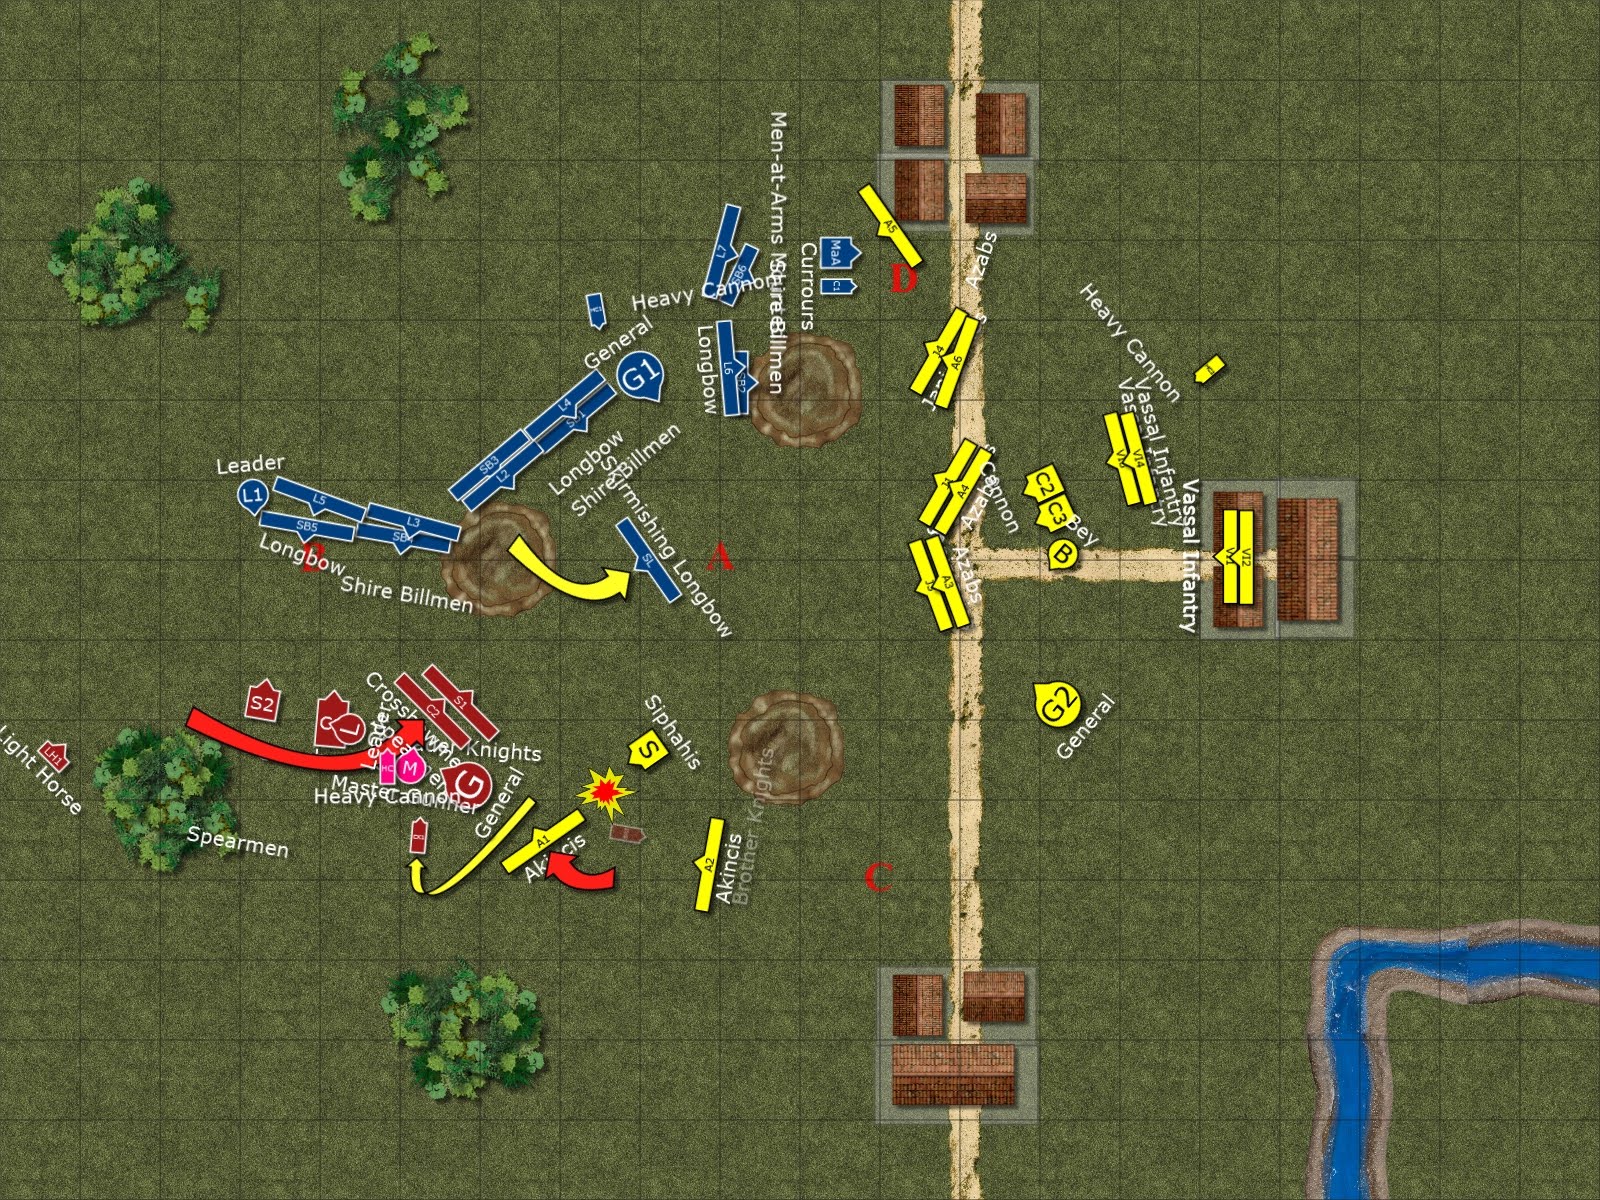
 |
| The Deployment zones |

Armies:
The Black Teutonians of Wales (Uffe):Leaders: Sir William the Marshall (General) and Galahad the Pure (Leader)
Troops: 3x Brother Knights (Templars of Brecon Hills, the Virgin Lake and the Templars who says Ni),
2x Crusader Knights (of the Blessed Virgin and the Trinity), 2x Light Horses (Ridders of the Grail and the Cross),
2x Crossbowmen (Archers from Mull and Islay), 2x Spearmen (Okehampton Freemen and Hungry Horses)
Special: The Master Gunner and Artillery (1x Heavy Cannon (Holy Mary), 1x Organ Gun (Hell's Fiery Breath))
 |
| The Master Gunner and his Artillery |
House of York (Kasper and Jens):
Leaders: General Melchett and Lord BlackadderTroops: 2x Men-at-Arms Mounted, 1x Currours,
4x Irish, 6x Shire Billmen, 6x Shire Longbowmen (4x Stakes), 1x Longbow Skirmishers, 1x Heavy Cannon

The Ottoman Turks (Per):
Leaders: Sultan Suleiman the Magnificent and Bey Selim II
Troops: 1x Kapikula, 1x Sheparis, 2x Akincis, 4x Janissaries (4x Camels), 4x Azabs (2x Stakes), 4x Vassal Infantry, 2x Cannons, 1x Heavy Cannon.
Deployment:

A note on the deployment - we tried the same system as last with each side taking turns at deploying a unit or a brigade. This is a fun little metagame, but does take some time. We will need to do something else next time. We also played with the new house rule of a "Scout Move" in which skirmishers get a free move - this worked excellently and I think we will be doing that from now on - looked great with the skirmishing screen being there from turn one (and might be an extra incentive to buy those skirmishers).
Both the Teutonians (red) and House of York (blue) set up relatively aggressively, aiming most of the forces at each other. The Ottomans on the other hand chose to deploy conservatively and set up far into their deployment zone, which is why the above map looks a bit weird.
 Of notable "mistakes" were the heavy cannon of the Ottomans (too far backwards) and the Teutonians' (half behind a hill), and the scattered single units of the Teutonians.

 | |
| The Teutonian lines - looking at the Yorkian troops |
 | ||
| The Ottoman Turks |
 |
| Two shots of the Yorkian Wedge |
 |
| The Yorkian deployment - and yes that is BattleChronicler running on the computer in the background. We tried doing the maps while the battle was fought and apart from a few mishaps it worked great and saved me a ton of time. |
Teutonic Turn 1

The first turn saw the Teutonians surge forward, even though their army was scattered throughout the deployment zone (the general had become a bit too involved in the deployment game and most units were not deployed as brigades, a factor that would come back to haunt the Teutonians in later turns).
Most units moved forward, the cavalry going towards the centre objective while one unit of Crusader knights decided to cause havoc and moved across the entire field - looking great but leaving them very isolated.
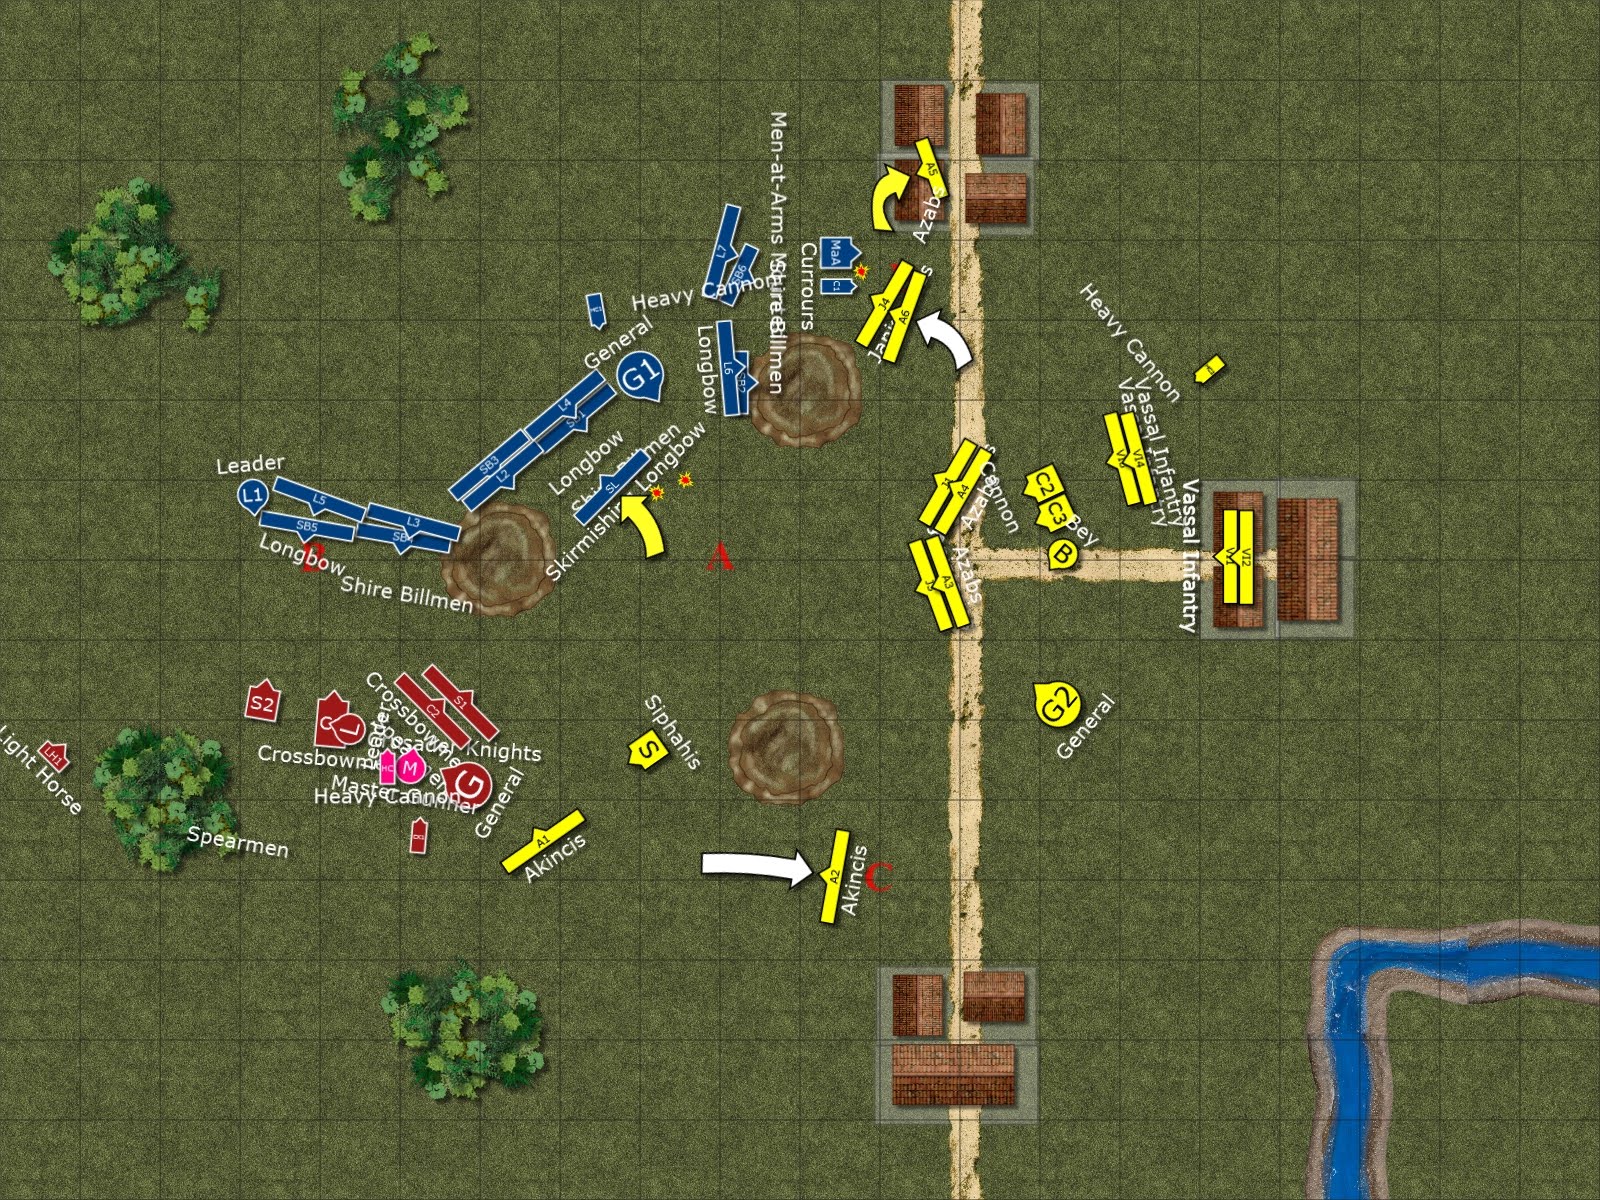
 |
| Teutonian first turn moves |

York and Ottoman Turn 1

The House of York's first turn consisted of a lot of desperate moves to try and get into position before the approaching Teutonians arrived at the scene. The Irish moved forward both securing the flank and providing a tasty target for the Teutonians. The combined units of Bill and Longbowmen moved forward, deploying and beginning to unleash their hail of fire on the Teutonians. The only result was to push the adventurous Crusaders towards the waiting Ottomans.
 |
| Lord Blackadder, aka Jens, contemplating the Teutonians |
 |
| General Melchett beginning the destruction of the Walesian Teutonians |
 |
| First turn Yorkian movement |
 | |
| General Suleiman the Magnificent, aka Per. |

Teutonic Turn 2

A turn of indecision for the Walesian Teutonians (I really wonder what that story is!) with only a single unit of Crusaders inching forwards. The Master Gunner ordered his Heavy Cannon to fire against the middle Irish unit, driving it far back and disrupting the warband brigade
York and Ottoman Turn 2

Mirroring the indecision of their opponent the Yorkian troops stayed put - and their arrows only succeeded in driving back (and confusing) a unit of Light Horses. Only movement is the right infantry moving into control of the objective and deploying their stakes - preparing to sell their lives at the cost of many knights.
 |
| The Yorkian leaders battling for control of the movement phase |
 |
| Yorkian Longbows prepare to unleash hell |
Au contraire, the Turks (having much more room to manoeuvre in) moved forward, forming a well diciplined line of battle, with the two units of cannons moving to the front, preparing to unleash hell.
 |
| Turkish line after turn two |
Teutonic Turn 3

York and Ottoman Turn 3

More Yorkian shuffling into position; the Irish try to regroup, the heavy cavalry move into recharge position or to take advantage of the cavalry-light left Teutonian flank while the longbows moved to punish the Crusaders. Which they do! One unit, hit by nine stands of longbows and one heavy cannon is decimated and blown 29cm back into their deployment zone. The other unit, only hit by one unit of longbows fare better and shrugs of the arrows - gearing up their horses for the coming charge.
The Ottomans begin their slow cavalry attack by moving the skirmishing Akincis forwards, right next to the heavy Brother Knights. Behind them the Ottoman knights start to move forward, using a hill as cover from the fearsome Teutonics. On the other flank the withdrawal of the cavalry encourages the Janissaries to moved up to the objective, and take a few pot shots at the Yorkian infantry in front of them.
Teutonic Turn 4

True to their nature the Teutonian knights charge forward - one unit drives the Akincis back and withdraw to just outside of the range of Ottoman knights. A unit of Crusader Knights charge into the Yorkian Bill and Longbow combination. The attack doesn't go well as they run into well trained billmen who, with the help of longbow fire destroy the crusaders (taking a single casualty themselves) and move forwards onto the hill, ready to fire at the Ottomans.
Elsewhere the infantry shifts into better positions, finally forming a brigade. In a strange move the Organ gun is moved forwards, right in front of the longbows (being essentially a sacrifice to stop the Yorkians disrupting and confusing the Light Horses, and setting these up for a charge next round - but an expensive one).
York and Ottoman Turn 4

The Yorkians redeploy the Cavalry to their left flank - in front of the Ottoman infantry whose cavalry support are now engaged elsewhere. The Irish finish their shuffling and prepare to take part in the battle.
Shooting sees the Janissaries pushed back and the heavy cannon does the same to a unit of Brother Knights on the other side of the field, confusing it in the process. The organ gun is also destroyed, but does the job of concentrating the longbow mens attention while the Light Horse gets ready to charge.

The Ottoman turn is plagued by failed orders and no units move, leaving some increasingly stranded.
Teutonic Turn 5

 |
| Light Horse units slaughtering Irish |

York and Ottoman Turn 5

The combat sees the Irish all massacred but both Light Horse units are pushed back, both at one stand each - effectively removing them from the game.
More impressive are the manoeuvres of the Ottomans - The Janissaries move forwards to dominate the centre with their bowfire (killing and confusing some of the Yorkian infantry on that flank) while the Heavy cavalry units of Sipharis and Kapikula begin a long march ending in a punishing charge to the flank of the Teutonian Brother Knights.
Unfortunately the result is far from ideal - they do one hit and are pushed back by the single stand fighting to its side (this was incredible - I have no idea what the odds were for this happening but they must have been low!).
 |
| The Ottoman cavalry charges... |
 |
| ...but have the table turned on them and take a beating from the Brother Knights |
 |
| The sad remains of the Ottoman knights - and the Templars who says Ni are ready to charge them... |
Teutonic Turn 6

York and Ottoman Turn 6

The Yorkians redeploy their infantry to secure the objective while the Heavy Cavalry (Men-at-Arms and Currours) charge the Janissaries on the left Yorkian flank. A brilliant move that is once again thwarted by the die - although the Janissaries are all killed, the cavalry suffers heavily and are pushed back - leaving them stranded in front of their own infantry and severely puzzled.
Shooting sees the destruction of the Kapikula by the Heavy Cannon (Boom) and the longbows, removing this the field.
Shooting sees the destruction of the Kapikula by the Heavy Cannon (Boom) and the longbows, removing this the field.
The Ottomans sense that their time has come and fly into combat - Azabs and Janissaries charge the remaining Yorkian cavalry while the Akinzis find inviting and exposed flanks of the Brother Knights all over the place. The Sipharis charge the remaining Brother Knights. The Yorkian cavalry manage to shrug of the charge by the Ottoman infantry (though both sides take casualties), leaving the objective contested. The Sipharis destroy their opponents and surge forward to help the Akinzis Humiliate and destroy most of the remaining Brother knights with surprising ease - even performing a brilliant "Buttocks of Doom" on the last unit. Impressive stuff and vengeance for the fate of the Kapikula.
 |
| The countercharged Yorkian Knights (the humiliation!) |
Teutonic Turn 7
York and Ottoman Turn 7
Last turn and all orders are failed by the Yorkian - to much irritation! Only the Skirmishing Longbowmen manage to prove intelligent - they evade from the Teutonian infantry into the central objective and thereby claim it and it looks like the Yorkians may have won the game by controlling two and contesting another. The longbowmen tries to help by pushing the Janissaries backwards - though their arrows all fall short, obviously tired after a long day of shooting).
But alas - the evil Ottomans wills it otherwise: the Akinzis evades backwards to control one objective and the Janissaries moves forwards again to contest another. The game now hangs in the balance - with the skirmishers in the centre deciding the result - if they can manage the Janissaries fire they will win the game for the Yorkians. But no - the Janissaries shoot as if they were trained to do nothing else and in a hailstorm of arrows drive the Skirmishers back and far from the objective.
As such the game of objectives ended in a draw and the winner would be decided from who had lost the fewest troops...
 |
| The Yorkian right flank at the end of the battle |
 |
| And the left - the contested objective is between the opposing infantry units |
 |
| And the centre - with the skirmishing unit on the left - pushed too far abck to control the objective and thwarting the Yorkian master plan... |
Final Situation and Losses:

Teutonic Order: (Unit-of-the-game: ? Light Horse ?)
3x Brother Knights, 1½x Crusader knights, ½+½x Light Horses: 710 (one unit from breaking)
House of York: (Unit-of-the-game: Heavy Cannon)
4x Irish, ½x Men-at-Arms Mounted: 210
Ottoman Turks: (Unit-of-the-game: Akinzis)
1x Shepharis, 1x Janissaries: 180
Post-Battle Remarks:
As evident from the numbers above the Ottomans won by 30 points! Amazing that a game of 3x7 turns and a total of 3750 points of troops is decided by a total of 30 points.
Apart from that little humiliation for the Yorkian troops (and that they couldnt kill the Master Gunner's troops even though they had plenty of chances) it was a great battle. Plenty of carnage and sneaky manoeuvres - stalwart infantry and daring cavalry charges. Just what we like and expect from Warmaster (which always delivers!).
As for the final results and their reason, then the hesitant play of the Ottomans gave them the victory as they had lost the fewest troops while the other forces had bled each others for a few turns before the Turks showed up. An intelligent strategy but not as much fun as to get stuck in from the start .-). Also the deployment of the Turkish artillery meant they saw little action throughout the game.
The Teutonians were also plagued by bad deployment with too few brigades and too many single units. Also the suicide charges of both Crusader Knight-units may have been too costly. They should probably have charged with the Light Horses on the flank while the Brother Knights could have cleared the Ottoman flank on the other side. I think the Teutonian general got caught trying to charge too many places (left, centre and right) and should have decided on one or two to dominate.
As for my own (and Jens') Yorkian troops then the infantry performed great - although they were nearly too many, having not enough room for a perfect deployment. The Heavy Cannon was a match winner as it had expensive enemy knight units to shoot at each turn and completely humiliated a Crusader Knight unit in one memorably turn. The Irish is a different case. They were there to stop the Teutonians which they did, but much too costly. all destroyed was bad and cost the battle. Maybe they should have been further back, or sent further forwards and maybe got a charge in (which they really couldnt because of the continued confusing and disrupting effects of the Teutonian Artillery). I am not sure - but in any case I blame my co-leader, Jens, as he was in charge of that flank :-).
The major disappointment was our knights - each side had a glorious charge of superior cavalry turn sour. In each case what looked like an easy victory turned into a rout and caused expensive losses (and in my case maybe the victory as the Janissaries should have been removed and providing me control with that objective). This is the case sometimes, but it feels bitter each time - good thing we also all had the brilliant charges we dream of :-).
Best regards,
Kasper
Again a nice battle report. I was able to relive my lousy performance once again. But you're right: the teutonian walesians general were to focused on the pre-game line up, there were no overall plan and ideas popped up all the time just to disappear like teardrops in rain. Only succes was to keep the Master Gunner and not to break.
ReplyDeleteYep - I wanted that Master Gunner dead!
ReplyDeleteAnd the old adage of having a master plan and sticking to it is probably appropriate in this case.
But a good thing the Ottomans got revenge from their beating in the last battle...
What program do you use to show your battle reports with the square grid, terrain, and unit markers?
ReplyDeleteAnother great battle report and I love your confused markers! What are they made of?
ReplyDeleteI was introduced to that same style of deployment recently and it does make for a nice tactical start to the game, but it looks as though from your experience it gets a bit unwieldy and slow over maybe 1500pts a side. Maybe bigger chunks of troops per deployment "turn" would work?
A version I've always wanted to try is blind deployment, to simulate a surprise encounter or poor pre-battle intelligence. So you set up a screen and both deploy your forces unseen. That might have worked well with 3 players and loads of points? Would fit into the scenario kind of as well.
Oh and it seems the comment issue is fixed. Looks like it is just some problem with my work computer.
Wuhuu - Comments!
ReplyDelete@Eric: The program is the great and free Battlechronicler.com. this is now at the stage where it is really easy to use and once the army is typed into the program the turns are done really quickly. I really recommend it.
@Simon: Yes, that is the type of deployment we normally use - but we wanted to try something new. Your idea of greater blocks of units is good - this might work, and simulate the vanguard etc idea of medieval armies. I will ahve to work on the finer details :-).
The Confusion markers (which were really needed in the first few games when we were all really confused ourselves) are made of thick cardboard, toothpicks and lots of red paint. They work great and makes forgetting confusion impossible. What we need now are counters for the first attack of lance wielding knights....
Best regards,
Kasper
Næste gang skal Ottomanerne have lidt mere kredit. Det må meget gerne fremhæves med rødt hvem vinderen egentlig var. Jeg synes at læse mellem linierne at The House of York var den egentlige vinder - men det er da helt galt. Suleiman har nedfældet sejrens sødme på nygarvet gedeskind.
ReplyDeletePer
En sejr på 30 points giver dig ikke meget mere end én linje, lede Suleiman!
ReplyDelete