Hello all,
As promised here are the battle report of our latest Warmaster Medieval battle.
The Scenario
The full rules of the scenario (even though they are quite short) can be found here:
http://warmasterdk.blogspot.com/2011/11/seize-and-control.html. But basically it is a scenario where at the end of each players turn if he controls one of the three central objectives (the hills, city, and forrest) he receives one victory point for each.
A quick note on the scenario: It worked well, gave Infantry a large role to play and was easy to keep taps on. Perhaps a few minor adjustments - it seemed weird that confused units could control an objective (even as rare a thing to happen) and perhaps introduce a rule to represent some random insurgence could throw units out of objects - local militias getting angry at loosing all their food? i.e. on a six the controlling units are moved outside of the object?
Army lists:
The Black Teutonians of Wales (Teutonic Order)
2500p - BP: 13 - Commanded by Uffe
Grand Master, 2x Lords
6 x Brother Knights (How do ya like mechanised medieval armies, eh? Bloody tiger tanks!)
3 x Crusader Knights
2 x Light Horses
7 x Crossbowmen
8 x Spearmen wih pavisses.
The Glorious House of York
2500p BP: 22 - Commanded by Kasper
King Richard, 2 x Lords
3 x Men-at-Arms-Mounted
4 x Currours
2 x Hobilars
12 x Shire Bill, 5 with stakes
8 x Shire Longbows
6 x Irish
5 x Peasants
2 x Heavy Cannons
1 x Organ Guns
Deployment:
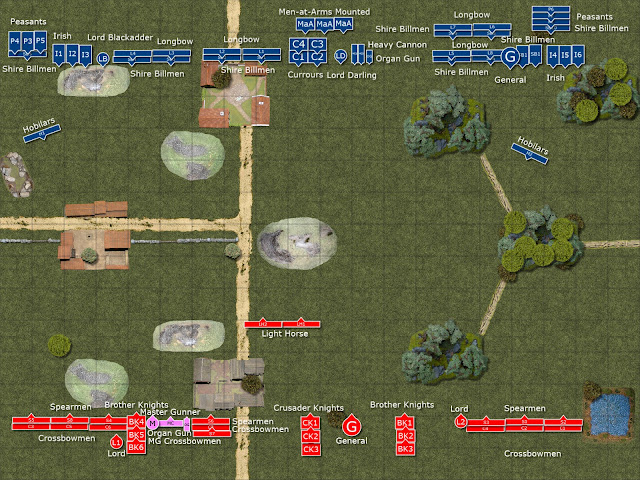
A few notes on my depoyment (i.e. York's) may be in order; the infantry were supposed to swarm the objectives on the flanks and sacrifice themselves while the cavalry and cannones were there to try and deter the Teutonian monster cavalry from participating. The Irish were the principal sacrificial troops to open up a path for the rest of the infantry while the peasantbrigades were there to fill up objectives with cannonfodder...
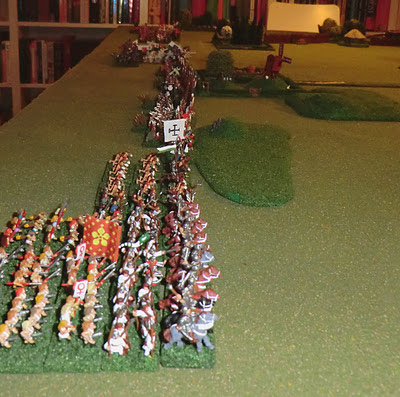
Three shots of the Yorkian deployment
And two of the Teutonian lineup (Buuuuh-Hiss at the unpainted lead!)
Turn 1 - House of York
First turn saw some placing infantry moves. In the center a full brigade managed three order rolls and firmly entrenched themselves upon the hill, daring anyone to come and dislodge them. On the other flanks more infantry moved up, marred by the first of many blunders this game. A few barrages of the british longbows drove the Teutonian Light Horses backwards dazed and confused.
Yorkian infantry bravely occupy the hill...
Victory Points: 1
Turn 1 - Teutonic Order
The countermoves were impressive; infantry swept forward on each flank while a strong brigade of feared Brother Knights moved rashly forward into a position from where they were threatening the entire right and centre of the Yorkian army.
Victory Points: 0
Turn 2 - House of York
Deciding something had to be done Richard III boldly led the charge of all the Men-at-Arms Mounted into the Brother Knights. Although casualties were high on both sides the Yorkians were triumphant destroying whole unit and causing much damage besides. They were able to just push the combat behind the line of sight of the remianing Brother Knights (BK4) hoping to survive a few hours more.
The Irish on both sides used the oppurtunity to sneak unnoticed into both flanking objectives and start looting.
Cavalry collides in a massive frenzy
A stand-off on the right flank
Final positions in the centre
Victory Points: 3
Turn 2 - Teutonic Order
Never fearing a combat the Teutnian charged in: succeding in many fansy order rolls botht he Brother Knights and the infantry behind them entered the fray and caused many bold Yorkian knights to die. On the other flank the infantry brigade tried assaulting the village but were thrown back by the defending Irish.
In the centre the brave York infantry were assaulted by hundreds of knights but, due to a miracle, managed to repel them and, although heavily damaged, held the centre hill.
The Teutonian might charges in..
... and are thrown back after serious fighting.
Victory Points: 0
Turn 3 - House of York
Deciding to try a bit of longranged destruction the Yorkians held their ground, except for a unit of Hobilars who together with the remains of the M-a-A destroyed a unit of Brother Knights before withdrawing.
The longbow and Cannon shots drove the tattered remians of one Brother Knights unit back (BK3).
A view from behind the Yorkian lines
Victory Points: 2
Turn 3 - Teutonic Order
Angry and even more angry the Teutonian might rumbled forward and killed every single infantryman on the hill, causing it to turn red with blood.
The Yorkian infantry are thrashed.
Victory Points: 1
Turn 4 - House of York
While the right infantry redeployed to take some crack shots at the centre cavalry the remaining M-a-A charged an inviting flank of the Teutonian cavalry line. Causing disappointing casualties they decided to hang in there. While they were fighting cannons and longbows caused massive confusiont o the other Teutonian cavalry units in the centre - buying their comrades another hour to live in. In a similar sacrifice the Hobilars moved in front of several units to protect the falnk of the MaA.
The long line of Teutonian cavalry are hit in the flank by Kig Richard III's finest knights.
And the Irish are busy pillaging the village.
Victory Points: 2
Turn 4 - Teutonic Order
Moving in for the kill the Crusader knights almost destroys the remaining MaA but the preceeding round of artillery fire had left many of the units dazed and now they were still in disarray.
oth infantry sides failed their order rolls as all eyes were upon the decimation of the nobility in the centre.
Victory Points: 1
Turn 5 - House of York
In an effort to save their comrades the brave Currours charge in and push back the Teutonian knights, many of whom die slipping on the bloodsoaked hill.
Infantry divisions redeploy and start shooting at the backside of the Teutonians.
The Currours charge in to rescue the remaining Men-at-Arms.
Victory Points: 1
Turn 5 - Teutonic Order
As the Teutonian knights slaughter the Currours the infantry are boldened by their efforts. The Master Gunner finally decides to do something and moves forward, as do the infantry brigade on the right, although they fail their attempt at charging.
Victory Points: 1
Turn 6 - House of York
Deploying th elast of his knights, Richard III orders the Currours to charge the centre where they destroy and push back the remaining Teutonians. More infantry move forward to secure the hill, while the Irish fall back a few meters to remain hidden in the forrest.
The last mounted reinforcements are deployed by the Yorkian general
Victory Points: 1
Turn 6 - Teutonic Order
To save the day the remaing two stands of Brother Knights charge in to clear the hill. Although they fight amazingly in the end the masses of Currours bring them down. The Infantry tries to roll up the falnk of the Yorkins but the order didn't make it to the spearmen (at least thats what they would claim afterwards...)
Witht hat the game ended - a game where the cavalry almost obliterated each other and the infantry had a strangely quite day at the front. Of the nine heavy knight units the Teutonians fielded only one remained and only one stand from the seven the York side fielded. While most of the light horses were still alive the sound of dying horses must have been intimidating (and one could not say that no animals were harmed during the production of this battle report :-)).
In the end ten units of cavalry and four of infantry died upon that hill - it must have been soaked in blood!
The last Brother Knights charge in to tip the scales
Victory Points: 0
Victory Points and Casualties:
Total Victory Points
Teutonic Order: 3
House of York: 10
Teutonic Order:
6 x Brother Knights [!]: 870
2 x Crusader Knights: 270
½ x Light Horse: 35
Total: 1175
House of York:
3 x Men-at-Arms-Mounted: 405
3½ x Currours: 385
2 x Shire Bill: 90
2 x Longbow: 90
Total: 970
Final thoughts
House of York:
Well the "men of the match"-award should defintely go to both brigades of Irish who more or less won me the game on Victory points by controlling two objectives almost throughout the game. As for the rest of the army I feel it performed well - the cavalry was able to compete with the scary Teutonian Brother Knights and even (through some lucky charges) managed to wipe them all out - albeit at heavy casualties to themselves. Their job was to keep the Cavalry away from my infantry, and in that they succeded.
The role intended for the infantry was to seize and control, which they did - perhaps a bit sluggish and many units never reached a suitable location to start shooting from, but thats all due to the die.
The cannons on the other hand is a bit of a "Hmmm". they did manage to kill 2/3's of a Brother Knight unit and sow confusion in another turn but is that woth 150points? Well I guess it sis (but the organ gun is gone forever :-)).
All in all a great game; won by infantry but through the workings of the cavalry and a bit of heavy support fire from the artillery - just as it should be :-).
I'll let Uffe explain what went wrong on the Teutonian side of the battle. One thing I should mention is that although many command rolls were missed if he had focused more on getting the infantry into the city and the forrest the Victory Point difference would have been much lower but I guess he got focused on the cavalry battles in the centre - which were bloody fun as well :-).
Hope you enjoyed the report - these beasts take an enormous amount of time to compile so I hope it is worth it!
All the best,
Kasper


